在Ubuntu上搭建Ghost的过程
转载请注明出处,不胜感激!
在第一篇博文诞生之后,我说过我之后会发布一篇文章作为学习记录下在Ubuntu上搭建Ghost的教程,由于最近很忙的关系迟迟没有写,本着学习在于一点一滴积累。
所以,今天我还是决定挤出时间写一下。一来,时间久了可以做一些技术回顾,二来,也可以总结一些成功的经验供未来通过搜索引擎找到这儿的网友一些帮助,毕竟我在这第一次上尤其还是不熟悉的Linux操作系统上栽了不少跟头。(注:因为有一些操作过程和网上很多安装过程都类似所以部分步骤我就直接引用了)
1. 登陆远程服务器
首先打开终端(因为我的环境是在Mac上),输入命令行ssh root@ IP address,回车。你会看到系统要求你输入登录密码。
Last login: Thu May 19 20:35:41 on ttys000
AndersWangdeMacBook-Pro:~ Anders$ ssh root@120.26.223.99
root@120.26.223.99's password:
Welcome to Ubuntu 14.04.2 LTS (GNU/Linux 3.13.0-32-generic x86_64)

 * Documentation:  https://help.ubuntu.com/

Welcome to aliyun Elastic Compute Service!

root@iZ23m138:~#
2. 安装Node.js
依次执行以下指令:
sudo apt-get update
sudo apt-get install -y python-software-properties python g++ make
sudo add-apt-repository ppa:chris-lea/node.js
sudo apt-get update
sudo apt-get install nodejs
确认是否安装成功:
node -v
v0.10.30
npm -v
1.4.21
3. 安装Nginx
执行以下指令:
sudo apt-get install nginx
4. 安装MySQL
Ghost 默认采用 Sqlite3 数据库,但是我还是建议用 MySQL,避免将来由于数据多、访问量多而导致性能下降。
执行如下指令开始安装 MySQL 吧:
sudo apt-get install mysql-server mysql-client
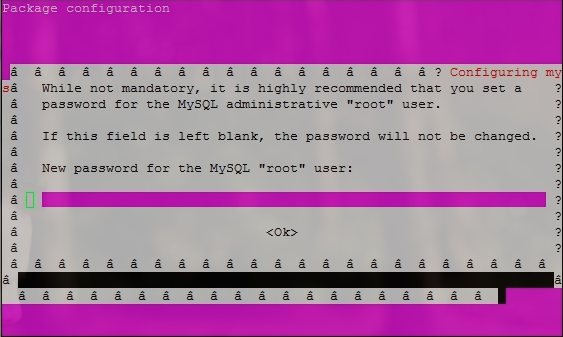
安装过程中,系统会提示你给 root 用户(这里的 root 是 MySQL 数据库的管理账号) 设置个密码,建议设置的复杂些,更加安全些。如下图:
MySQL 安装成功后,我们执行以下指令进一步加强 MySQL 的安全设置:
sudo mysql_secure_installation
此工具所做的增强安全设置包括:移除所有匿名账户、限制远程 root 账户登录、删除 test 数据库等。下面列出详细设置:
NOTE: RUNNING ALL PARTS OF THIS SCRIPT IS RECOMMENDED FOR ALL MySQL
      SERVERS IN PRODUCTION USE!  PLEASE READ EACH STEP CAREFULLY!

In order to log into MySQL to secure it, we'll need the current
password for the root user.  If you've just installed MySQL, and
you haven't set the root password yet, the password will be blank,
so you should just press enter here.

//输入安装 MySQL 时为 root 账户设置的密码
Enter current password for root (enter for none):
OK, successfully used password, moving on...

Setting the root password ensures that nobody can log into the MySQL
root user without the proper authorisation.

You already have a root password set, so you can safely answer 'n'.

//是否修改 root 账户的密码?前面设置过 root 账户的密码了,如果不打算修改密码的话,输入 'n'
Change the root password? [Y/n] n
 ... skipping.

By default, a MySQL installation has an anonymous user, allowing anyone
to log into MySQL without having to have a user account created for
them.  This is intended only for testing, and to make the installation
go a bit smoother.  You should remove them before moving into a
production environment.

//是否删除匿名用户?
Remove anonymous users? [Y/n] y
 ... Success!

Normally, root should only be allowed to connect from 'localhost'.  This
ensures that someone cannot guess at the root password from the network.

//是否禁止 root 账户远程登录?
Disallow root login remotely? [Y/n] y
 ... Success!

By default, MySQL comes with a database named 'test' that anyone can
access.  This is also intended only for testing, and should be removed
before moving into a production environment.

//是否删除 MySQL 默认创建的 test 数据库,并删除所有对 test 数据库的权限设置?
Remove test database and access to it? [Y/n] y
 - Dropping test database...
 ... Success!
 - Removing privileges on test database...
 ... Success!

Reloading the privilege tables will ensure that all changes made so far
will take effect immediately.

//是否重新加载权限表?
Reload privilege tables now? [Y/n] y
 ... Success!

Cleaning up...


All done!  If you've completed all of the above steps, your MySQL
installation should now be secure.

Thanks for using MySQL!
OK!MySQL 到此就安装好了!
下面,我们为为 MySQL 设置默认字符集。将数据库、htnl页面、源码文件都设置为统一的字符集会减少很多麻烦,当然,utf8 是最好的选择。
执行如下命令:
cd /etc/mysql
这条命令的作用是进入 /etc/mysql 文件夹。
然后输入:
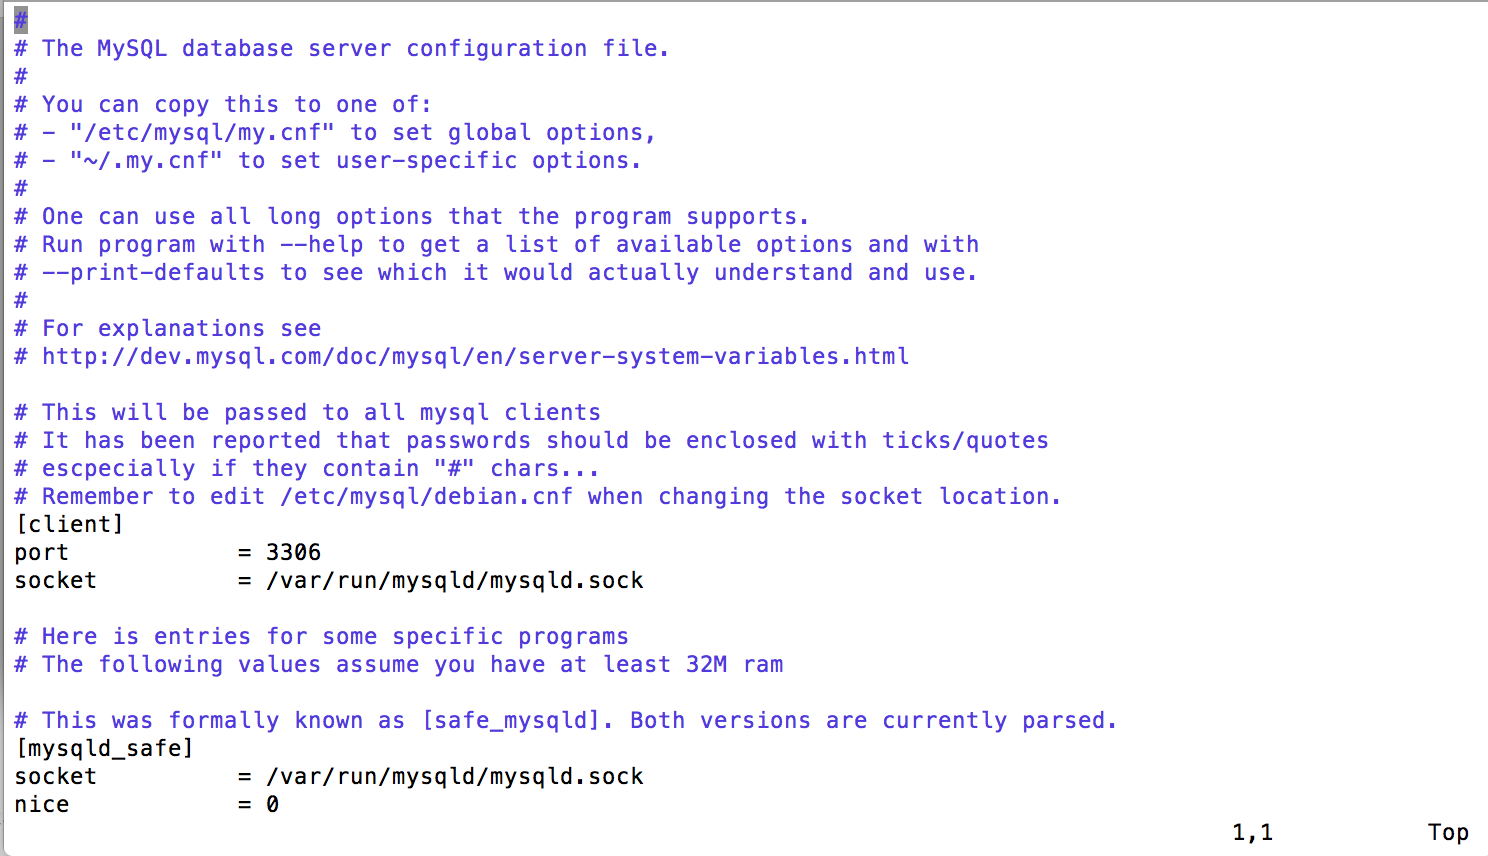
vi my.cnf
这条命令的作用是用 Vim 编辑器打开 /etc/mysql 目录下的 my.cnf 文件,然后就可以在终端对文件进行修改了。就像下面这样的界面:
将光标定位到 [mysqld] 位置,按 "i" ,这时可以修改了,添加如下设置:
[mysqld]
collation-server = utf8_unicode_ci
init-connect='SET NAMES utf8'
character-set-server = utf8
修改完成之后,先按 esc ,然后输入 :wq ,退出MySQL。
在检查以前记得我们要重新启动Mysql,否则不会生效,之后为了确保设置成功,我们检查一下:
进入 MySQL 命令行界面:mysql -uroot -p,输入之前你自己设置的MySQL密码。 输入指令: show variables like 'char%'; 输出是否如下所示:
root@iZ23m138b17Z:/etc/mysql# mysql -uroot -p
Enter password:
Welcome to the MySQL monitor.  Commands end with ; or \g.
Your MySQL connection id is 724764
Server version: 5.5.46-0ubuntu0.14.04.2 (Ubuntu)

Copyright (c) 2000, 2015, Oracle and/or its affiliates. All rights reserved.

Oracle is a registered trademark of Oracle Corporation and/or its
affiliates. Other names may be trademarks of their respective
owners.

Type 'help;' or '\h' for help. Type '\c' to clear the current input statement.

mysql> show variables like 'char%';
+--------------------------+----------------------------+
| Variable_name            | Value                      |
+--------------------------+----------------------------+
| character_set_client     | utf8                       |
| character_set_connection | utf8                       |
| character_set_database   | utf8                       |
| character_set_filesystem | binary                     |
| character_set_results    | utf8                       |
| character_set_server     | utf8                       |
| character_set_system     | utf8                       |
| character_sets_dir       | /usr/share/mysql/charsets/ |
+--------------------------+----------------------------+
8 rows in set (0.03 sec)
再输入指令:show variables like 'collation%'; 检查一下结果:
mysql> show variables like 'collation%';
+----------------------+-----------------+
| Variable_name        | Value           |
+----------------------+-----------------+
| collation_connection | utf8_general_ci |
| collation_database   | utf8_unicode_ci |
| collation_server     | utf8_unicode_ci |
+----------------------+-----------------+
3 rows in set (0.00 sec)
如果是上面的结果,恭喜你,搞定 MySQL 了!!!
5. 安装Ghost
创建数据库
我们希望 Ghost 搭配 MySQL 数据库运行,因此需要为 Ghost 创建一个 MySQL 数据库。前面已经安装好 MySQL 了,现在我们就来创建数据库吧:
mysql -uroot -p -e 'create database ghost;
系统会提示你输入 MySQL 数据库的 root 账户密码(还记得前一章节安装 MySQL 时设置的密码吗?)。指令执行之后就创建了一个叫做 ghost 的数据库,将来,你的文章就是存在这里喽!
配置Nginx
我们希望利用 Nginx 做 Ghost 的前端代理服务。OK, 输入下面命令进入 /etc/nginx/sites-available/ 目录:
cd /etc/nginx/sites-available/
然后输入下面指令:
sudo touch ghost.conf
sudo vi ghost.conf
还记得 vi 指令的作用吗?最后一条指令的作用是 vim 编辑器打开 ghost.conf 文件进行编辑。我们输入如下内容:
server {
    listen 80;
    server_name anders.wang *.anders.wang 120.26.223.99;

    location / {
        proxy_set_header   X-Real-IP $remote_addr;
        proxy_set_header   Host      $http_host;
        proxy_pass         http://127.0.0.1:2368;
    }
}
完成之后按etc :wq 退出编辑。
然后我们为 ghost.conf 文件做一个软链接到 /etc/nginx/sites-enabled/ 目录下:
sudo ln -s /etc/nginx/sites-available/ghost.conf /etc/nginx/sites-enabled/ghost.conf
这里要稍许补充说明的是在sites-available文件夹下保存着都是一些可用的文件,nginx真正每次启动会检查sites-enable文件夹下的软链接,所以确保sites-enable文件夹下软链接正确。
安装forever
如果是通过 npm start 启动 Ghost 的话,只要你关闭了远程连接,Ghost 也就停了,这个我们当然不希望喽。幸好,有 forever 工具帮我们解决这个问题。接下来执行以下指令来安装 forever :
sudo npm install forever -g
下载Ghost
Ghost 安装包是经过压缩的,在 Linux 上我们需要用 unzip 工具对其解压,因此,首先要安装 unzip 工具:
sudo apt-get install unzip
接下来我们下载 Ghost 安装包:
cd /srv/
sudo curl -L http://dl.ghostchina.com/Ghost-0.5.0.zip -o ghost.zip
上面命令中网址的版本号可以根据ghostchina.com 上的最新版本修改,我写这篇文章的最新版本是0.5.0,所以我输入的是0.5.0。
将其解压缩:
sudo unzip ghost.zip -d ghost
现在,/srv/ghost/ 目录下面就是我们的 Ghost 系统了!
修改Ghost配置文件
我们进入 Ghost 系统目录,为 Ghost 增加配置文件并配置数据库:
cd /srv/ghost/
sudo cp config.example.js config.js
sudo vi config.js
最后一条指令是用 vim 打开 config.js 文件进行编辑。我们只修改 production 一节的配置信息,修改为如下形式(注意按照你自己的实际情况替换!):
// ### Production
    // When running Ghost in the wild, use the production environment
    // Configure your URL and mail settings here
    production: {
        url: 'http://ghostchina.com', //替换为你自己的域名。
        mail: {},
        database: {
            updateCheck: false,
            client: 'mysql',
            connection: {
                host     : '127.0.0.1',
                user     : 'root', //我们暂且用 MySQL 的 root 账户
                password : '123456', //输入你的 MySQL 密码
                database : 'ghost', //我们前面为 Ghost 创建的数据库名称
                charset  : 'utf8'
            }
        },
        server: {
            // Host to be passed to node's `net.Server#listen()`
            host: '127.0.0.1',
            // Port to be passed to node's `net.Server#listen()`, for iisnode set this to `process.env.PORT`
            port: '2368'
        }
    },
完成之后按etc :wq 退出编辑。
安装 Ghost 依赖库
打开 Ghost 系统的目录下面的 package.json 文件,将 "sqlite3": "2.2.0", 这一行删除掉(注意,你看到的 sqlite 版本可能会不一样,但是,只要是 sqlite3 字样,删除即可)。
接下来,进入存放 Ghost 系统的目录并安装 Ghost 所依赖的 npm 包:
cd /srv/ghost/
sudo npm install --production
很快,所有依赖包就安装好了,当前目录下会多出一个 node_modules 目录。
启动 Ghost
执行如下指令重启 Nginx、启动 Ghost:
sudo service nginx restart
cd /srv/ghost
sudo NODE_ENV=production forever start index.js
OK,至此,所有的操作都做完了。现在打开浏览器并输入你的域名看看吧!